
First experience.
I woke up early one Tuesday morning and pushed the bike to a nearby parking lot to try and ride.I had taken the toolkit along as well, to fix any last minute issues.
Finally, sitting on the bike was a great feeling. It had taken almost 7 months to get to the final form after bike frame changes, seat changes and lots of other redesigns. However, try as I could , I could not pedal even one revolution. I kept falling over, and I found it quite difficult to push the ground from that position to gain any momentum. Finally, the top tube just popped out from the force of my feet on the pedals and the retaining nut broke. I was gutted, and felt it not worth the effort of all these months. So I pushed the bike back home and thought about what to do next.
Turns out the problems were not so serious. A little welding and fixing later,I was back at the parking lot early on Wednesday morning . Having set up the gears this time to make it easy, I got my wife to hold the bike so I didn't fall .I set off and after a few tries, sure enough, I was off. It took me a while to figure out how to ride it, considering the hands need to balance out the power from the feet.
Since then , I've since learned to ride on roads as well. The hardest part is all the attention that the bike draws. I have gotten better at riding with a straight face as if its just another day at the office. As usual its kids that are most excited, however adults of all shapes and sizes give a goofy grin when they see it. This on the small bylanes, I wonder how its going to be on the main roads with traffic .
I wouldn't have gotten this far without help from lots of people. Balu for the seat fabrication, Muneer for the cycle alignment, Vijay who fabricated a whole new bottom bracket from scratch and of course my wife for the support and encouragement ,given that I turned the living room literally into a cycle workshop for the past few months.
Showing posts with label cruzbike recumbent. Show all posts
Showing posts with label cruzbike recumbent. Show all posts
Saturday, August 23, 2008


Monday, August 18, 2008
Cruzbike almost there.
Its been a while since I've started this and thought I would post some pics of the bike with some notes on the construction.
My first attempt was using a standard bottom bracket shell ,but the fabricator who I worked with seemed to think it was too complicated, hence I got it fabricated from scratch. Note that the cruzbike needs a pivot joint (and not a fixed chainstay ) .

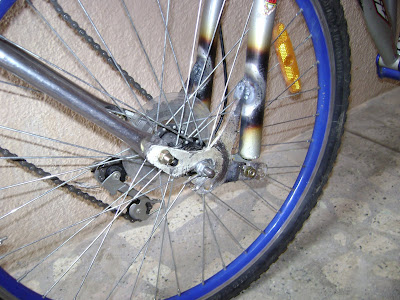
The next step was to cut a small triangle so that the wider rear hub can fit the front fork. It might make sense to try and widen the front fork as well. The shape was cut from steel plate and took many iterations to fit it right.
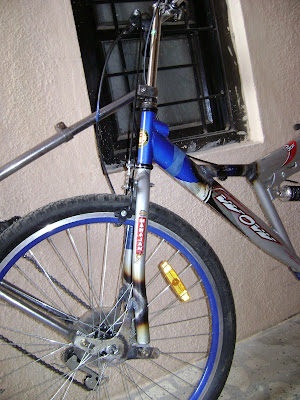
The triangle was welded to the front fork, which was turned backwards so that the trail is positive.
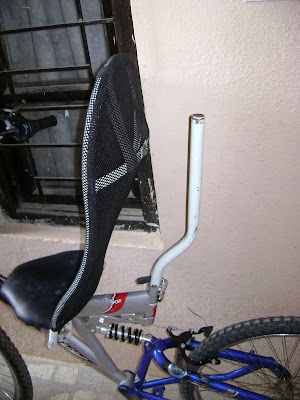
A bent rod was used where the seat post sits, to allow the seat to recline as required. For starters, a reasonably upright position would be a good bet as it allows the rider to put his feet down quickly.
The seat
It was constructed out of bent lightweight tube, and sits on the top tube of the donor bike. The seat itself is plywood with foam, and the backrest is breathable nylon fabric.
The tube attaching to the stem to the bottom bracket is telescoping just like a normal seat post. It allows adjustment for riders with different height.
The rear derailleur is attached the same way in the front. However, I still need to learn a bit more to fix the shifter for the chain rings.
Pictures of the completed bike:

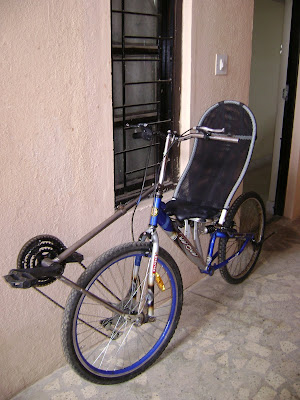
My first attempt was using a standard bottom bracket shell ,but the fabricator who I worked with seemed to think it was too complicated, hence I got it fabricated from scratch. Note that the cruzbike needs a pivot joint (and not a fixed chainstay ) .

The next step was to cut a small triangle so that the wider rear hub can fit the front fork. It might make sense to try and widen the front fork as well. The shape was cut from steel plate and took many iterations to fit it right.
 |
| From cruzbike near... |
The triangle was welded to the front fork, which was turned backwards so that the trail is positive.
 |
| From cruzbike near... |
A bent rod was used where the seat post sits, to allow the seat to recline as required. For starters, a reasonably upright position would be a good bet as it allows the rider to put his feet down quickly.
 |
| From cruzbike near... |
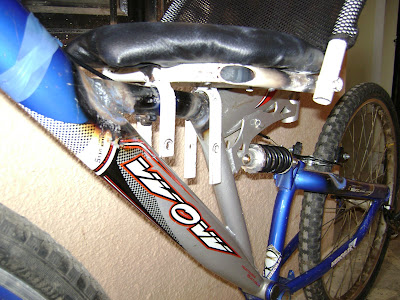
The seat
It was constructed out of bent lightweight tube, and sits on the top tube of the donor bike. The seat itself is plywood with foam, and the backrest is breathable nylon fabric.
 |
| From cruzbike near... |
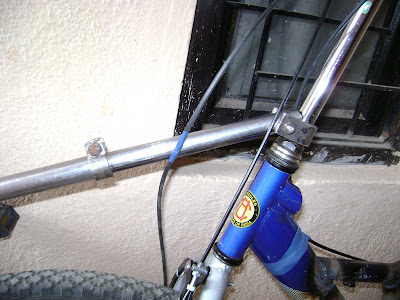
The tube attaching to the stem to the bottom bracket is telescoping just like a normal seat post. It allows adjustment for riders with different height.
 |
| From cruzbike near... |
The rear derailleur is attached the same way in the front. However, I still need to learn a bit more to fix the shifter for the chain rings.
 |
| From cruzbike near... |
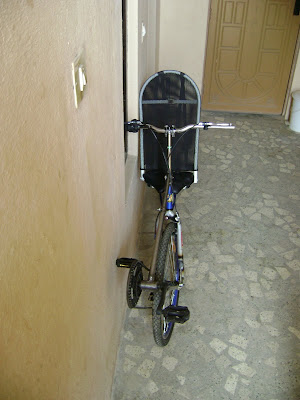
Pictures of the completed bike:
 |
| From cruzbike near... |

Wednesday, July 30, 2008
Cruzbike construction continued..
Apart from the seat, the new bottom bracket (on top of the front wheel) and the front fork dropouts are the new artifacts to be fabricated.

The new dropout is pictured on the left ( courtesy the cruzbike yahoo group ) .
The reason these dropouts are used is that the width of front(~100mm) and rear(~130mm) hubs are different. If you notice the picture carefully, the arm that attaches to the front fork is at a different level than the rest of the dropout, about 15mm inside. This allows using a 130mm hub along with an ordinary front fork of 100mm.
These can be machined out of 4-6mm steel (or aluminium) plate.
The bottom bracket.
The bottom bracket for a cruzbike sits on top of the front wheel. My initial design used a bottom bracket cut out of an old Hero jet cycle ( the ones used by doodhwallas ). However, apart from the weight, there is another big flaw .
Since the bottom bracket 'triangle' changes every time the length of the top tube is changed ( when a person of different height is riding ) , or when a front fork with a shock absorber changes height, one of the angles of the triangle has to be variable. (see the attached picture, courtesy )
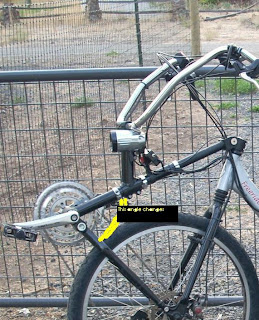 The design I used is similar to the one in the cruzbike kit . It uses a standard BB with a telescoping boom , but an additional pivot allows the angle to change. Got this done on the second attempt.
Another advantage of this (somewhat expensive) procedure is that it makes the front triangle strong. Without a strong pivot joint, the whole assembly will flex with the torque generated by the pedals, and that torque will cause the tube to twist and the chain might slip off.
Forthcoming..
The seat, and putting it all together.
Apart from the seat, the new bottom bracket (on top of the front wheel) and the front fork dropouts are the new artifacts to be fabricated.

The new dropout is pictured on the left ( courtesy the cruzbike yahoo group ) .
The reason these dropouts are used is that the width of front(~100mm) and rear(~130mm) hubs are different. If you notice the picture carefully, the arm that attaches to the front fork is at a different level than the rest of the dropout, about 15mm inside. This allows using a 130mm hub along with an ordinary front fork of 100mm.
These can be machined out of 4-6mm steel (or aluminium) plate.
The bottom bracket.
The bottom bracket for a cruzbike sits on top of the front wheel. My initial design used a bottom bracket cut out of an old Hero jet cycle ( the ones used by doodhwallas ). However, apart from the weight, there is another big flaw .
Since the bottom bracket 'triangle' changes every time the length of the top tube is changed ( when a person of different height is riding ) , or when a front fork with a shock absorber changes height, one of the angles of the triangle has to be variable. (see the attached picture, courtesy )
 The design I used is similar to the one in the cruzbike kit . It uses a standard BB with a telescoping boom , but an additional pivot allows the angle to change. Got this done on the second attempt.
Another advantage of this (somewhat expensive) procedure is that it makes the front triangle strong. Without a strong pivot joint, the whole assembly will flex with the torque generated by the pedals, and that torque will cause the tube to twist and the chain might slip off.
Forthcoming..
The seat, and putting it all together.
Subscribe to:
Posts (Atom)


 Posts
Posts


