I'd bought a SeaEagle SE 330 kayak about 3 years ago, because I had some fledgling interest in water sport at that time. But what I really enjoyed doing was kayaking in some of the rivers of coastal Karnataka.
At first, I was quite apprehensive as to how it would be. I neither had experience doing long stretches, nor had any idea if there were rapids or bridges or such on the way. But there had to be a first time and I 'bit the bullet' so to speak, on the Sita Nadi.
Sita nadi is one of the few rivers in the south where one can find some good rapids. I have whitewater rafted the stretch many times in the past. However, I wanted something simpler and less demanding this time.
When my friend N made travel plans to Brahmavara which is very close to the river, I decided to join him and club it with an exploratory trip. My approach was to find a bridge upstream, where we could start and paddle till the we reached the mouth of the river. Looking up Google Maps we found such a place in Kokkarne and formed our plan.
We reached the starting bridge around 11 in the morning and got into the water. A farmer nearby warned us that there was a small dam in the way, and said 'Neevu HaarBahudu' (literally that you could jump off the top, apparently a height difference of 6 feet). We were looking around for this 'drop', but it turned out that the tides were in our favour and we had actually navigated across at the same level. After a lot of easy paddling, we reached the coastal Mabukola bridge in about 4 hours and got off.
View Larger Map
That was the first trip, and since then I've navigated a few more rivers.
The Sharavathi river is also quite interesting to explore. Since its a dam-controlled river ( the dam is at Gerusoppa) there is not much flow, but the banks are very picturesque. One must watch out as there is some commercial traffic in the form of sailboats. Incidentally, before roads were built, people used to travel upstream from Honnavar on an all-night sailboat journey to reach Gerusoppa. There is a lot of birdwatching possibilities for bird lovers at the mouth of the river where it meets the sea. The bridge which crosses the river at Honnavar is one of the longest in the state, and its a heady feeling to move out from the relatively narrow river to a two kilometre wide stretch at the bridge. There are also some small uninhabited islands ideal for lunch picnic.
Reaching the starting point at Gerusoppa is an hour's ride from Honnavar by road.
My paddling partner V made a video of the kayak trip.
The Zuari river in Goa was the location for the next paddle trip. My partner and I started from Ponda town intent on reaching the sea, but we stopped well short of our goal because of bad headwinds. However, most rivers in Goa are badly polluted since barge traffic carries ore from the river bank to ships in the port. A substantial part of the ore unfortunately ends up in the river, giving it a muddy brown shade. However, as one paddles, one gets a good chance to see the less-touristy side of Goa, as well as the tidal mangroves that line the shores.
The Nethravati river near Mangalore also has some good stretches to paddle. One of the objective hazards is a small dam on the way that one needs to get across.
View Larger Map
One could catch up with other kayakers on the dreamroutes forum.
Tuesday, October 7, 2008
Saturday, August 23, 2008
First cruzbike ride
First experience.
I woke up early one Tuesday morning and pushed the bike to a nearby parking lot to try and ride.I had taken the toolkit along as well, to fix any last minute issues.
Finally, sitting on the bike was a great feeling. It had taken almost 7 months to get to the final form after bike frame changes, seat changes and lots of other redesigns. However, try as I could , I could not pedal even one revolution. I kept falling over, and I found it quite difficult to push the ground from that position to gain any momentum. Finally, the top tube just popped out from the force of my feet on the pedals and the retaining nut broke. I was gutted, and felt it not worth the effort of all these months. So I pushed the bike back home and thought about what to do next.
Turns out the problems were not so serious. A little welding and fixing later,I was back at the parking lot early on Wednesday morning . Having set up the gears this time to make it easy, I got my wife to hold the bike so I didn't fall .I set off and after a few tries, sure enough, I was off. It took me a while to figure out how to ride it, considering the hands need to balance out the power from the feet.
Since then , I've since learned to ride on roads as well. The hardest part is all the attention that the bike draws. I have gotten better at riding with a straight face as if its just another day at the office. As usual its kids that are most excited, however adults of all shapes and sizes give a goofy grin when they see it. This on the small bylanes, I wonder how its going to be on the main roads with traffic .
I wouldn't have gotten this far without help from lots of people. Balu for the seat fabrication, Muneer for the cycle alignment, Vijay who fabricated a whole new bottom bracket from scratch and of course my wife for the support and encouragement ,given that I turned the living room literally into a cycle workshop for the past few months.
Monday, August 18, 2008
Cruzbike almost there.
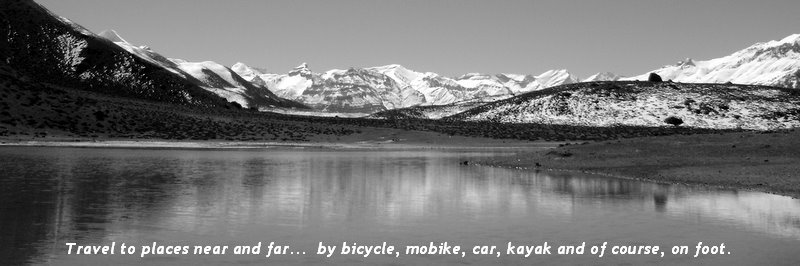
Its been a while since I've started this and thought I would post some pics of the bike with some notes on the construction.
My first attempt was using a standard bottom bracket shell ,but the fabricator who I worked with seemed to think it was too complicated, hence I got it fabricated from scratch. Note that the cruzbike needs a pivot joint (and not a fixed chainstay ) .

The next step was to cut a small triangle so that the wider rear hub can fit the front fork. It might make sense to try and widen the front fork as well. The shape was cut from steel plate and took many iterations to fit it right.
The triangle was welded to the front fork, which was turned backwards so that the trail is positive.
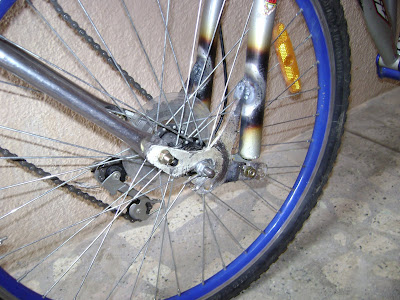
A bent rod was used where the seat post sits, to allow the seat to recline as required. For starters, a reasonably upright position would be a good bet as it allows the rider to put his feet down quickly.
The seat
It was constructed out of bent lightweight tube, and sits on the top tube of the donor bike. The seat itself is plywood with foam, and the backrest is breathable nylon fabric.
The tube attaching to the stem to the bottom bracket is telescoping just like a normal seat post. It allows adjustment for riders with different height.
The rear derailleur is attached the same way in the front. However, I still need to learn a bit more to fix the shifter for the chain rings.
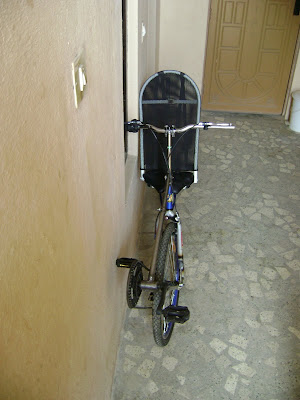
Pictures of the completed bike:

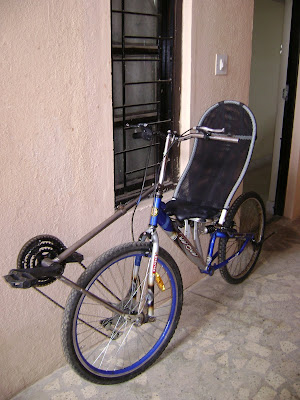
My first attempt was using a standard bottom bracket shell ,but the fabricator who I worked with seemed to think it was too complicated, hence I got it fabricated from scratch. Note that the cruzbike needs a pivot joint (and not a fixed chainstay ) .
The next step was to cut a small triangle so that the wider rear hub can fit the front fork. It might make sense to try and widen the front fork as well. The shape was cut from steel plate and took many iterations to fit it right.
 |
| From cruzbike near... |
The triangle was welded to the front fork, which was turned backwards so that the trail is positive.
 |
| From cruzbike near... |
A bent rod was used where the seat post sits, to allow the seat to recline as required. For starters, a reasonably upright position would be a good bet as it allows the rider to put his feet down quickly.
 |
| From cruzbike near... |
The seat
It was constructed out of bent lightweight tube, and sits on the top tube of the donor bike. The seat itself is plywood with foam, and the backrest is breathable nylon fabric.
 |
| From cruzbike near... |
The tube attaching to the stem to the bottom bracket is telescoping just like a normal seat post. It allows adjustment for riders with different height.
 |
| From cruzbike near... |
The rear derailleur is attached the same way in the front. However, I still need to learn a bit more to fix the shifter for the chain rings.
 |
| From cruzbike near... |
Pictures of the completed bike:
 |
| From cruzbike near... |
Wednesday, July 30, 2008
Cruzbike construction continued..
Apart from the seat, the new bottom bracket (on top of the front wheel) and the front fork dropouts are the new artifacts to be fabricated.

The new dropout is pictured on the left ( courtesy the cruzbike yahoo group ) .
The reason these dropouts are used is that the width of front(~100mm) and rear(~130mm) hubs are different. If you notice the picture carefully, the arm that attaches to the front fork is at a different level than the rest of the dropout, about 15mm inside. This allows using a 130mm hub along with an ordinary front fork of 100mm.
These can be machined out of 4-6mm steel (or aluminium) plate.
The bottom bracket.
The bottom bracket for a cruzbike sits on top of the front wheel. My initial design used a bottom bracket cut out of an old Hero jet cycle ( the ones used by doodhwallas ). However, apart from the weight, there is another big flaw .
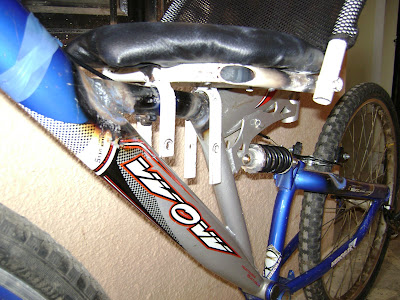
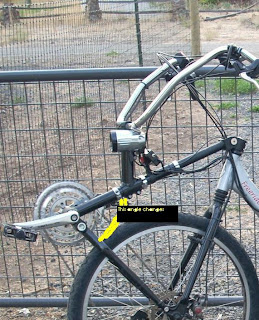
Since the bottom bracket 'triangle' changes every time the length of the top tube is changed ( when a person of different height is riding ) , or when a front fork with a shock absorber changes height, one of the angles of the triangle has to be variable. (see the attached picture, courtesy )
 The design I used is similar to the one in the cruzbike kit . It uses a standard BB with a telescoping boom , but an additional pivot allows the angle to change. Got this done on the second attempt.
Another advantage of this (somewhat expensive) procedure is that it makes the front triangle strong. Without a strong pivot joint, the whole assembly will flex with the torque generated by the pedals, and that torque will cause the tube to twist and the chain might slip off.
Forthcoming..
The seat, and putting it all together.
Apart from the seat, the new bottom bracket (on top of the front wheel) and the front fork dropouts are the new artifacts to be fabricated.

The new dropout is pictured on the left ( courtesy the cruzbike yahoo group ) .
The reason these dropouts are used is that the width of front(~100mm) and rear(~130mm) hubs are different. If you notice the picture carefully, the arm that attaches to the front fork is at a different level than the rest of the dropout, about 15mm inside. This allows using a 130mm hub along with an ordinary front fork of 100mm.
These can be machined out of 4-6mm steel (or aluminium) plate.
The bottom bracket.
The bottom bracket for a cruzbike sits on top of the front wheel. My initial design used a bottom bracket cut out of an old Hero jet cycle ( the ones used by doodhwallas ). However, apart from the weight, there is another big flaw .
Since the bottom bracket 'triangle' changes every time the length of the top tube is changed ( when a person of different height is riding ) , or when a front fork with a shock absorber changes height, one of the angles of the triangle has to be variable. (see the attached picture, courtesy )
 The design I used is similar to the one in the cruzbike kit . It uses a standard BB with a telescoping boom , but an additional pivot allows the angle to change. Got this done on the second attempt.
Another advantage of this (somewhat expensive) procedure is that it makes the front triangle strong. Without a strong pivot joint, the whole assembly will flex with the torque generated by the pedals, and that torque will cause the tube to twist and the chain might slip off.
Forthcoming..
The seat, and putting it all together.
Choosing a donor bike for a cruzbike.
Currently, bike manufacturers (atleast in India) seem to believe in unusual bike frames. The traditional diamond frame seems to have given way to many versions of the y-frame . I believe the reason for that might be, kids (or even women ) can easily straddle the top tube of a y-frame bike, and they would not need to keep changing frames as they grow older. However most bikes are too heavy .
The cruzbike manufacturers have a recommendation page for the donor bike. There are also a few pages that talk about Tom Traylor's recommendations (Tom is the original designer and patent holder for moving bottom bracket front wheel drive bikes, from which the cruzbike has evolved) However, some of the things dont really translate well into indian conditions:
So to evaluate a potential donor bike, take a tape measure (to measure the top tube height, anything below 26 inches is great ) , protractor ( to measure the head angle, close to 60 degrees is optimal ) , and a weighing scale ( to measure the weight of the bike ). My Hercules Wow weighed about 16 kilos , I expect that the additional kit would be between 5-10 kilos, so its important to choose a donor bike that is as light as possible.
The cruzbike manufacturers have a recommendation page for the donor bike. There are also a few pages that talk about Tom Traylor's recommendations (Tom is the original designer and patent holder for moving bottom bracket front wheel drive bikes, from which the cruzbike has evolved) However, some of the things dont really translate well into indian conditions:
- Hardly any bikes are available in multiple frame sizes.
- Which means that one needs to choose a bike with as low a top tube as possible, regardless of frame size.
So to evaluate a potential donor bike, take a tape measure (to measure the top tube height, anything below 26 inches is great ) , protractor ( to measure the head angle, close to 60 degrees is optimal ) , and a weighing scale ( to measure the weight of the bike ). My Hercules Wow weighed about 16 kilos , I expect that the additional kit would be between 5-10 kilos, so its important to choose a donor bike that is as light as possible.
Cruzbike in Bangalore: work in progress

I've been toying with the idea of recumbents ever since the day long rides from Bangalore to Savandurga would leave me sore in all parts. Surfing the net led me to recumbents. And I have been dreaming ever since of owning one. Done everything from write to bicycle manufacturers about them (well, ye, its hard to contain a giggle hearing that, considering how good our indian bicycle manufacturers are at actually communicating, for the record, i've never got a reply from *any* manufacturer), to start building a Short wheelbase (SWB) recumbent. But the attendant problems (Find a good fabricator, chain management and many others), meant that the bike never saw light of day.
Until now.
Yep, in may I surfed across to cruzbike. Never mind all the features , but what struck me first was that this is probably the easiest recumbent to home build. Cruzbike actually sells a kit that can convert a y-frame bike into a cruzbike, but at 400$ plus shipping and customs, I wonder how much that will turn out to be. Hence the decision to build.
In the next few posts I'll try to lay out what it takes to build a cruzbike.
Saturday, April 12, 2008
Cycling loop around Bangalore
Late one friday evening it struck me that there are lots of places Bangalore roughly 50 to 100 kms away. I spent some time playing with google maps to create a loop.
It would give an outsider from Bangalore a good look at the scenic beauty that includes lakes, hills, forts, forest areas & sanctuaries as well as the hiking areas.
View Larger Map
Starting off from Hoskote ,head to Chintamani. Just before Chintamani is Kaivara betta ,a wonderful hiking place. From there the road winds south to Kolar . Antargange is a little hillock very close to Kolar town, there is a little deer sanctuary here.
The route then turns south west to Malur and thence to Hosur. From Hosur, a state highway leads to Thalli, situated in the backyard of the Bannerghatta forest, a great place to see elephants. The road from Thalli to Harohalli via Maralwadi is very scenic. It has a few small climbs, the Mavuttur dam on the road side as well as the ever popular hiking hotspot Rangaswami betta . The route hits Kanakapura road at Harohalli and proceeds south on the highway till Kanakapura. From Kanakapura, a right turn leads to Ramnagar. This route has a lot of hillocks, B M Betta to start with . The road surface is quite good all the way till Ramnagar. In Ramnagar , take the road that leads to Magadi. This part of the route is my personal favourite, good road surfaces as well as the scrub jungle of the Savanadurga state forest.
After passing Savanadurga , the route cuts across the highway to Mangalore on the route to Dobbaspet. The distinctive spike of granite known as Shivagange is seen even from Savandurga. Its a short hike to the top although there are too many people (and worshippers) on weekends.
Cutting across the NH-4 at Dobbaspet, head to the Devarayanadurga. There is road to the top of this hill, and from there there is panoramic view of the Devarayanadurga state forest . A short ride away is Madhugiri, a sharp conical hill with 7 dwaras from ancient times . The Maidanahalli blackbuck sanctuary is very close.
From madhugiri, the route heads east will the start point, Chintamani. On the way is Nandi hills as well as Kalavarahalli (which has 'shot to fame' of late and is very crowded on weekends).
The better part of this loop is that is avoids the main highways out of Bangalore and sticks to the state highways. While the roads are not always great, it is definitely safer.
Accomodation options: There are a few Kamat restaurants on the highway which offer dorm acco (of the 'cheap and best' variety). There is one in Dobbaspet, and one near Kolar. However, one should be able to camp out near Thalli/ Savanadurga /Siddarabetta . There are also plenty of big towns for 'propah' accomodation.
Tuesday, April 1, 2008
Honey Valley and Tadiandamol
The trip to Honey Valley was a long pending one, and once we had 4 people in our team and the booking done, we were really looking forward to the trip.
Honey valley is a 70 acre property located close to Tadiyendamol . The 'normal' route to Tadiyendamol is a pretty boring route, what with tar roads and coffee estates for company (unfortunately most urbanites seem to confuse coffee estates for forests, something no self respecting outdoor enthusiast would forgive). Honey valley is run by a Coorgi family in a very homely sort of way, not trying to masquerade as a resort.
We got to Kabbinkaad junction early after a overnight bus from Bangalore, and soon the jeeps arrived. Honey valley is a short (but quite eventful ) 4x4 jeep ride away from the nearest road.
After a quick breakfast and the ritual application of leech retardants (contact me for the patent-pending formula ..hehe ) we started out on the trek.
The route quickly climbs out on to a ridge that eventually connects to the base of Tadiyendamol. Its mostly easy walking on grasslands with the occasional drop into a Shola forest. We
were hiking in the tail end of the monsoons, and the visibility kept dropping to a few feet, so we were forced to keep everyone in sight. It took us a good 5 hours to reach the base of Tadiyendamol (marked by a big black rock ,after which the climb starts).
At this point the rain gods wanted to show us who was the boss, and it was interesting lighting the stove and cooking under multiple umbrellas and raincoats and eating the bread while trying to keep dry. After a while we had to give up the pretense of trying to stay to dry and we started the final climb. By now the bridle path was pretty much a stream and we could'nt see the ground we were walking on .
M who was walking with me was looking a little too confident considering her naivete ,but the path which was slippery earlier was much easier to walk on with the gushing water on it. After darting in and out of the little sholas on the route (it was like walking through a waterfall in the pouring rain inside), we arrived at the grassland close to the top. Unfortunately, we didn't get any sort of views thanks to the weather. That didn't stop us from enjoying some more of our food and we started back down.
The return trip was quite uneventful except for M enjoying the leech bite sensation . After getting back to Honey Valley, the well fed leeches were told to take a hike. Later that evening, we were treated to a wonderful evening concert , thanks to 2 gentlemen in the next room who made up for lack of talent with a guitar with a surfeit of alcohaalu .
The next morning we pampered our legs by not walking around and not skimping on the breakfast one bit. We were joined by A & B for lunch and got late for catching our bus back to Bangalore. A made it up just in time by some manic driving (we reached a minute late but the bus was still around).
We were privy to some more entertainment in Gonikoppa thanks to a tableaux of a very gory sort, for this was republic day. The bus was stopped forcibly . First came an auto and bike collision (on top of a truck) and we were amazed with all the blood and people lying around in moony positions. But it turned out to be the start, later there was a car & bike accident, and the last one was an actual minitruck collision. In addition to a couple of bomb blast scenes, landslides and other natural disasters, it made for a wholesome evening. I guess the tableaux makers need elevation to the national stage for their expertise with fake blood.
Made it back to Bangalore close to midnight.
Tuesday, February 26, 2008
Ride around to devarabetta
M and me went on a short bike ride to Devarabetta on sunday.
Devarabetta is a small rocky outcrop on the southern edge of the Bannerghatta forest. We left early enough, and around 7 am we were at Harohalli ,where we take a left turn . This leads to Thalli (and Rangaswamy betta as well ) .
The road surface is bad in the beginning, but the scenery more than makes up for it. The Rangaswamy range of (low) hills continues along this road , and apart from the fields, there is plenty of scrub jungle all around. Being close to harvest season, there was plenty of Ragi (and other crops I don't know ) on the roads, so that vehicle movement would thresh it.
Around 10.30 am we reached Thalli and found the road to Devarabetta a few kms away. The forest around the temple is thankfully untouched, we have rarely spotted garbage on all our visits here.
Just below the main rock dome of the temple, there is rather large waterhole. Usually there is a lot of elephant dung around, as well as some rather large footmarks only those pachyderms are capable of. Unfortunately, we have yet to see any of them when we have visited. So we watched the bee eaters flit around while we haggled over the quality of Bingo chips .
The road from there till Hosur road is an absolute beauty. Despite it being a sunny day, there are so many trees on this road that is fun to ride. Great place for cycling too, as it doesn’t have many switchbacks.
Harohalli (kanakapura road) – Thalli – Devarabetta – Anekal –
Subscribe to:
Posts (Atom)

